Monday, May 19, 2014

Welcome to Tracy McLennon

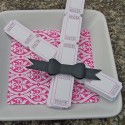
Cape Breton Orchestra Layout
Curtsey Boutique Designer
Tracy McLennon
 I am excited to introduce Tracy McLennon to you today. You may be familiar with her artwork as she has had frequent appearances in Memory Makers, Canadian Scrapbooker and Creating Keepsakes magazines.  


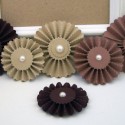
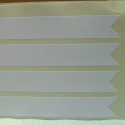
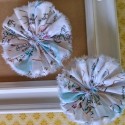
Today Tracy shares a 12x12 layout featuring our fancy bloom flowers, dyed doilies and raffle tickets. 

Curtsey Boutique Supplies


Friday, May 16, 2014

Welcome Kristin Greenwood

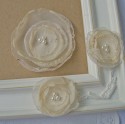
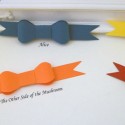
The Best Things in Life Aren't Things Layout
Curtsey Boutique Designer
Kristin Greenwood
 It is so exciting to be welcoming all our wonderful new talent to the team. One of the best parts of the Curtsey Boutique's growth is getting to share how are products are used by others.  Kristin's lovely layout is chock full of Curtsey Boutique goodness, I hope you enjoy all the lovely details as I much as I did.


Curtsey Boutique Supplies


To see more of Kristin's delightful work visit her blog by clicking on her image below.


Wednesday, May 14, 2014

Bottoms Up Layout with Alyssa McGrew

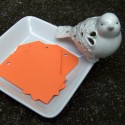
Bottom's Up Layout
Curtsey Boutique Designer
Alyssa McGrew

Today's 12x12 layout comes from Alyssa McGrew. I love how she uses our pennant labels to build layers into her layout - they are so much more affordable than the stickers out on the market and you can print or stamp anything you like on them.

It seems that Alyssa's daughter has found even milk to be a special treat when enjoyed from a pretty glass.


Curtsey Boutique Supplies


To see more of Alyssa's work, visit her blog by clicking on her photo below.

Monday, May 12, 2014

DIY Gold Glitter Striped Muslin Bag Tutorial with Rebekah Faries

DIY Gold Glitter Striped Muslin Bag Tutorial
Curtsey Boutique Designer
Rebekah Faries
Rebekah is big into gift wrapping lately and so for her most recent tutorial she decided to try her hand at decorating bags. Curtsey Boutique muslin bags are perfect for tucking in smaller gifts when you don't feel like wrapping with paper.

Gold seems to be the color of the moment and feathers are fun and everywhere you look in the crafting world.  Today's DIY technique teaches you how to mimic the beautiful gold glitter bands on Rebekah's bag.

The secret is using double sided quick hem tape which can be found in any sewing store.  

Regular double sided tape won't stick to fabric well, but quick hem tape is made for fabric and holds beautifully.

1. Simply decide how many bands of color you want, trim to size and adhere. 

2. Be sure to rub all over with a bone folder (or your fingers) to guarantee great adhesion of the tape to the fabric.

3. Peel off the protective paper and cover generously with glitter.

4. Press the glitter into the tape before tapping off any excess.

Voila! Mess free bands of yummy gold glitter.

Add Baker's Twine and other embellies to jazz up your bag.


Other Supplies
Double Sided Quick Hem Tape: Singer
Gold Glitter: Martha Stewart
Stamp: Feather Finery: PTI
Ink: Fine Linen: PTI
Feathers
Gold Button: Craft Supply
Date Label: MME
Love Diecut: Pink Paislee
Seam Binding: French Market
Bird Paper Clip: Michaels

Curtsey Boutique Supplies


To see more of Rebekah's work be sure to click on her image below and visit her blog, Midnite Lullabies.


Friday, May 9, 2014

Love Always Mommy Layout by Lisa Spiegel


Love Always Mommy Layout
Curtsey Boutique Designer
Lisa Spiegel

Have you ever pulled out a coat or purse after having not used it in awhile and discovered a $10 bill? It is such a lovely unexpected surprise. The same thing happened to me today when I was doing a bit of inbox cleaning I found one more project from Lisa that I hadn't shared yet with you - a lovely surprise!

Lisa filled her layout with doilies, a library card, vellum bag and our shipping tags. 

In her own words "I use all of these products on almost every layout I create!  I just love the subtle layering they allow and the ability to hide my journaling in the vellum bag is one of my best tricks to sharing meaningful journaling that you might not want everyone looking through your album to see."

Curtsey Boutique Supplies


Wednesday, May 7, 2014

Welcome Raechelle and an Altered Photo Frame


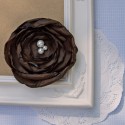
You are My Happy Altered Photo Frame
Curtsey Boutiqu Designer
Raechelle Bellus

It is so exciting to introduce you to all the new talent we have joining our team this Spring!  

A big welcome to Raechelle Bellus as she debuts her first project her on the blog. Also debuting is our new Parisian Map ruffle flowers. I love the print on this flower - the whimsical pencil drawings of Parisian land marks and light colors are perfect for Spring projects. Raechelle embellished her flower with our wood buttons and a bit of twine, a punched heart and a gold sequin.


Materials:
patterned paper: MME, EP 
words: Teresa Collins
sequins: Hazel & Ruby
twine: Target dollar bin
gold paint: Martha Stewart
frame: Melissa Frances

Curtsey Boutique Supplies


To see more of Raechelle's lovely work visit her blog by clicking on the image below.

Friday, May 2, 2014

DIY Vintage Photograph Bag Tutorial by Connie Mercer

Vintage Photograph Bag Tutorial
Curtsey Boutique Designer
Connie Mercer
One of the absolute best parts of my morning routine is checking out my inbox to see what lovely creations my designers have sent me. I truly am amazed by their creative and this project by Connie is perhaps one of my most favorite.

Today she shares a lovely tutorial for making photograph bags to house lovely vintage snapshots. I hope you enjoy following along.

       1. Take the muslin bags and soak them in strong tea.

2


2. Let them set for about 30 min.  Then take them out and dry them.  (I let mine drip dry outside)


13.    Cut out your leaves using the Spring Greenery by Tim Holtz/Sizzix.
44.   Hot glue a cluster to center of the muslin bag.
55.  Hot glue the burlap butterfly over the leaves.

66. Take the seam Binding and spray it with water and scrunch it up in a ball.
77. Apply the Distress stain to it ~ random places and dry with a heat tool.
  8. Make a messy bow and adhere it to the center of the butterfly.

19. Stamp the white tag with your message and adhere under the wing of the Butterfly.
110. Gather some photographs and wrap twine around.
11.  Insert in bag for gift giving.

Other Supplies:
Buttons
Darkroom Door Stamp
Ranger ink
Tim Holtz/Sizzix die
Tea bags (for dyeing Muslin bags)
Ranger/Tim Holtz Distress ink (Antique Linen)
Hot glue

Curtsey Boutique Supplies


To see more of Connie's lovely work be sure to visit her blog by clicking on her image below.