Wednesday, December 7, 2011

Vintage Mini Bingo Card Tag


Tag with Curtsey Boutique Bingo Cards and Felt Roses


 It sounds incredibly dorky, but I really like playing bingo. Whenever we go on holiday or if I am hanging with my older relatives who are champion competitive players, I love buying a card and playing along. I seldom win, but the chance of coming away with a free cruise or silly snow globe gets me every time.

This tag showcases the Curtsey Boutique's new Vintage Mini Bingo Cards and our Cheery Cherry Rolled Felt Roses. The little Precious Pink Butterfly is a sneak peak at what we have coming up for January's new products.

Curtsey Boutique Vintage Mini Bingo Cards
I like the way vintage bingo cards look on cards and in scrapbook pages, but wanted a smaller easier to work with size. Our vintage minis come on either white or kraft cardstock, in green, pink, red and black ink and measure approximately 2.25 x 2.75 inches.


They are 4 for $1.00 and can be found in our Dollar Deals section HERE.

Dollar Deals items always ship free with another purchase in the USA.


Don't forget about the Curtsey Boutique's ongoing Giveaway for a $15.00 gift certificate and 3 free Cricut Cartridges.


Cartridges Up for Grabs


Here are the Rules for the GiveAway


1. Follow and leave a comment on this post.

2. Like our Facebook page here.

3. Refer  friends for additional chances to win (just have them post on facebook or the blog as to who referred them) - 1 entry per friend who enters the contest

4. The Giveaway is open to all in the US and Canada, and American Military addresses anywhere

5. International participants are welcome if they pay for their shipping

6. One winner to be chosen on 19 December!

We Need Your Vote!!!

Have you heard of Heartsy.me  ?

 Its a fun place that features exclusive private sales on handmade items - like your favorite Etsy shops. But they only include stores that people vote for. You don't have to sign up or hand out any personal information to vote.


Interested in getting Curtsey Boutique items at 50%?

Vote for us HERE so we can become a Heartsy deal! You have to vote within the next 72 hours for us to be considered.

Don't forget about the Curtsey Boutique's ongoing Giveaway for a $15.00 gift certificate and 3 free Cricut Cartridges. Wouldn't it be great to win the Gift Certificate and then be able to buy items at half off?

Cartridges Up for Grabs


Here are the Rules for the GiveAway

Rules:

1. Follow and leave a comment on this post.

2. Like our Facebook page here.

3. Refer  friends for additional chances to win (just have them post on facebook or the blog as to who referred them) - 1 entry per friend who enters the contest

4. The Giveaway is open to all in the US and Canada, and American Military addresses anywhere

5. International participants are welcome if they pay for their shipping

6. One winner to be chosen on 19 December!

Monday, December 5, 2011

Curtsey Boutique Grand Opening and 3 Cricut Cartridge Giveaway


So its official - I've caught the Etsy bug and opened my very own shop. For the past 5 weeks I've been working hard on beginning my inventory and learning all things Etsy. It is the reason for my blog silence. I appreciate the kind inquires and concerns of my blog followers and fellow crafters. I'm fine, just creating like mad.

My shop's name is the Curtsey Boutique - doesn't that just sound fun? I love the idea of having an occasion you have to curtsey for and want my crafts to celebrate the whimsy, wonder and excitement such a time would involve.

I thought it would be fun to do a giveaway to celebrate the Curtsey Boutique's grand opening.

Giveaway Prizes:

 $15 Gift Certificate to the Curtsey Boutique - store can be found here 


Cricut Cartridge: Christmas Village


Cricut Cartridge: Thanksgiving


Cricut Cartridge: Christmas Cards


Rules:
1. Follow and leave a comment on the Curtsey Boutique blog found here.

2. Like us on Facebook here

3. Refer  friends for additional chances to win (just have them post on facebook or the blog as to who refered them) - 1 entry per friend who enters the contest


4. The Giveaway is open to all in the US and Canada, and American Military addresses anywhere

5. International participants are welcome if they pay for their shipping

6. One winner to be chosen on 19 December! 

I'd love to hear what you think about the shop and any things you would like to see me stock. I've got lots in the works, but had to start somewhere!

Curtseying to all of  you,

CarrieAnne

Thursday, October 27, 2011

Monogrammed Mini Kraft Matchbooks

Mini Monogrammed Kraft Matchbooks
I know there will be audible gasps, but I actually made something without my Cricut! It doesn't happen often, but like Blue Moons and hunky men picking up my dinner tab it does happen (okay, maybe my hubbie is the only man who has ever picked up my dinner tab - but you get the idea).

These matchbooks are eensy weensy and so cute - about an 1 x 2 inches. I used an OLD (like back in the day when the red Sizzix was the thing) Large red Sizzix die for them. They have been distressed with my favorite ink - VersaMark, dry embossed and the inside pages are held in with stitches through the button on the cover. I had a set of Technique Tuesday stamps with lots of fun phrases on them and did a few with monograms and a few with stamps.

My daughter is begging to take a few to hand out to her friends so they can pass notes to each other (during recess, of course she swears). I haven't decided if I want to give her teacher that kind of headache or not. They would be fun to write a phone number or shopping list on and a super inexpensive gift.

Pin It


Thanks for Note-cing my posts,

CarrieAnne

Recipe:
Die: Sizzix
Embossing Folder: Cuttlebug: Swiss Dots
Ink: VersaMark, Stampin' UP!
Paper: Couture Cardstock
Floss: DMC (Ecru)
Stamps: Technique Tuesday

Monday, October 24, 2011

Faux Hoop - Spider Web Decor


Halloween Faux Embroidery Hoop Tutorial
Altered embroidery hoops are EVERYWHERE these days, and though they only cost a few dollars to purchase from the local craft store I got the urge to make one at 3 am. Someday, when I'm rich I think I will build a crafstore which is only open when children are sleeping - that way all the night owl crafters like myself will have somewhere to shop and meet their late night craft urges.

So there I was, a girl wanting to alter an embroidery hoop with no hoop supplier in sight - what was I to do? Pull out some chipboard scraps of course and get to the making do we crafters are so good at.

Faux Embroidery Hoop Tutorial

1. Cut 4 strips of light weight chipboard and 4 strips of coordinating patterned paper with your paper cutter - dimensions 12 x 1 inches.

2. Using something uber strong and stickalicous ( I went with Beacon Adhesives Zip Dry) glue two of the strips together, overlapping 1/4 inch - repeat this step again to create an oval. For maximum cuteness be sure the overlapped ends are on the inside. Allow this hoop to completely dry - use binder clips if you need to maintain the oval shape and keep the ends together.

3. Adhere two of your patterned paper strips to the inside of your hoop with Zip Dry (Mod Podge would also work).

4. Using the Happy Hauntings Cricut Cartridge, cut the web from the "3DSpider" cut with the Layer 2 function selected at 8 inches from light weight white cardstock.

5. Glue the web strands to the outside of the inner hoop one at a time, going around the hoop in clockwise direction. Use a super strong adhesive again for this step.

6. Attach your remaining two chipboard strips together, but only on one end. Use Zip Dry to wrap and adhere this chipboard strip around the hoop with spider web.  The ends will once again overlap about 1/4 inch and this is okay.

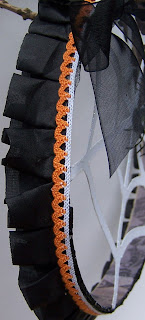
7. Cover the exterior hoop with patterned paper and then cover the patterned paper with a pleated trim and lace edging. I used Zip Dry for all these layers.

8. Snip off any visible spider web edges that extend past the chipboard hoops.

9. Coat the entire front edges (the edge you see when looking at the hoop as it hangs on the wall) with black Pearl Pen. This really adds depth and dimension and gives the hoop its faux hoopiness.

10. Apply Ranger Stickles in Diamond to the inner and outer edges of the spiderweb.

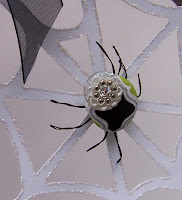
11. Add your spider - mine is create from a fabric covered buttons, a sparkly button,  the ends of a black floral pick, and two regular buttons layered underneath to give it some height. A plastic spider would work equally well.

12. Add an organza black bow at the top and your wall is ready to be spookified!.

Pin It


Thanks for playing a little hoops with me,

CarrieAnne


Recipe:
Cricut Cartridge: Happy Hauntings
Cardstock: Couture Cardstock
Patterned Paper: Pink Paislee
Adhesive: Beacon Adhesives: Zip Dry
Tools: Imaginisce: I-Top
Chipboard: Couture Cardstock
Pearl Pen: Viva Decor
Buttons, Floral Pick: Stash
Ribbon: Making Memories, May Arts

Cuts:
From the Happy Hauntings Cricut Cartridge, cut the web from the "3DSpider" cut with the Layer 2 function selected at 8 inches from light weight white cardstock.


Wednesday, October 19, 2011

Pretty Scary Mummy Card - Evidence that good taste can be Fickle


Mini Monsters Mummy Card
Today's  Halloween card is evidence that my judgment and "taste level" (to plagiarize Project Runway) is not always on its A Game. I used Provo Craft's Mini Monsters cartridge and from the very beginning I was plagued with problems. My daughters wanted me to make a "girly" card with a Halloween theme. Instead of going for the easy "A" and choosing a witch or other typically female typecast gory girl I choose to add a second "X" chromosome to a mummy card.

My girls absolutely love every detail from the handmade flower to the bakers twine shoe bows, but I think its a bit ugly - without being sure it is in the "pretty ugly" category. Maybe its the mismatched eyeballs or the idea that mummy wrappings would ever come in 80's pink and lime green, whatever is up with this card it has left me a bit unsettled and wondering who I could give it to. Perhaps a frienemy?

I thought I would share the card anyway since its done and my eldest says I should embrace my off days too (which is proof positive of her affinity for fortune cookies).


Mortified after muffing up a mummy,

CarrieAnne


Recipe:
Cricut Cartridge: Mini Monsters
Embossing Folder: Cuttlebug: Swiss Dots
Patterned Paper: Basic Grey
Cardstock: Couture Cardstock
Bling: Recollections
Twine: The Twinery
Adhesive: Beacon Adhesives Zip Dry, Stampin' UP!

Ink: VersaMark

Cuts:
"Mummy" from the Mini Monsters cartridge cut at 5.5 inches with the Card function selected.

"Mummy" cut at 5.5 inches with the Layer 1 function selected.

"TrkRTrt2" cut at 1.75 inches with the Phrase function selected.

"TrkRTrt2" cut at 1.75 inches with the Phrase function and shift key selected.

Sunday, October 16, 2011

Mom Sleeping Sign - An antidote to doorbell torture

Mom Sleeping Sign
My son is a fantastic sharer - he hates sleeping and feels a strong desire to deny me its rejuvenating benefits as well. He is currently on a schedule in which he sleeps from about 5am to 8:30am and then if he is feeling generous he'll take an hour or so nap around dinner time. I've taken him to the pediatrician just to make sure he's not a vampire, or some kind of bizarre nocturnal mutation and all she did was chuckle and shake her head in that "stinks to be you, and there's nothing I can do to help" type of way. Why is it we have to pay a co-pay again if they don't actually provide a solution to your problem? You'd never go in and order food at a restaurant, pay and not actually eat something.

But I digress...

I'm not quite sure how my 12 month old is functioning, I feel like a garbage compacter that mated with a tornado - devastated and not to good looking or smelling. (How do you shower when your now mobile infant never hits the pause button?) I have become obsessed with snatching a few moments of sleep whenever and wherever I can. Did you know a microwave situated above your stove doubles as a vertical pillow?

So woe be it to any kindly delivery man or neighbor should they lovingly ring the door bell when my son accidentally nods off for a nano second. I'm fairly certain my local flower delivery man checked to see if I was on the FBI's most wanted list after the not so happy reception he got when he attempted to play Chop Sticks on my door bell last week. To make it worse he didn't even have the right door! I think he should have given me the two dozen roses as an apology, but perhaps he was to scared to offer them to me.

So to spare delivery men, government employees and poor college kids trying to sell magazine subscriptions from future harm, I made this sign to hang over our door bell.

I know they normally say "baby sleeping," but I pride myself on honesty and accuracy.

A sleep deprived pseudo human,

CarrieAnne

Recipe:


Cricut Cartridge: Sweethearts, Sugar and Spice
Embossing Folder: Cuttlebug: Textile Textures
Ribbon & Lace: May Arts
Cardstock: Couture Cardstock
Chipboard: Maya Road
Alphastickers: Jillibean Soup, October Afternoon, American Crafts
Patterned Paper: Crate Paper, October Afternoon, Jillibean Soup
Ink: VersaMark
Twine: The Twinery
Adhesive: Beacon Adhesives Zip Dry, Glue Dots, Stampin' UP! Dimensionals


Cuts:
Sleeping Mom
"1stKiss" cut from the Sweethearts cartridge at 6 inches from fleshtone cardstock.
"1stKiss" with Layers function selected  cut from the Sweethearts cartridge at 6 inches from brown and vanilla cardstock, and green polkadot patterned paper.

Bed -
"Naptime" cut from the Sugar and Spice Cartridge cut at 4.5 inches from ecru cardstock
"NapTme-s" cut from the Sugar and Spice Cartridge cut at 4.5 inches from blue and ecru striped patterned paper
"NapTme-s" cut twice with the layers function selected from the Sugar and Spice Cartridge cut at 4.5 inches from red cardstock
"Naptime" cut twice with the layers function selected  from the Sugar and Spice Cartridge cut at 4.5 inches from floral print patterned paper

Circle Background -
With Real Dial Size selected use the "Hugs-s" cut set at 8 inches from the Sugar and Spice Cartridge

Wednesday, October 12, 2011

Graduation Cap (Mortarboard) Gift Box

Graduation Cap Gift Box with Happy Hauntings Cartridge
  You probably looked at the heading to this post and wondered whether I was aware that we are full into Fall and not Spring's graduation season. Well, while working on a Halloween project I will be sharing with you later, I came across the 3d cemetery box in the Happy Hauntings cartridge and the shape of it spoke to me.

It said "Don't I look just like a graduation cap box if you remove the tombstones, creepy hand, tree, etc."

And my crafty self replied, "Why yes, yes you do."

I was afraid if I didn't try the idea out right away I would forget about it. This was sooo easy to do and I can't wait till Spring when I can make lots of them. Never one to miss an opportunity to do something different, I choose vintage Crate and October Afternoon papers to add a little personality to this traditional blah piece of celebratory apparel. The mortarboard top is attached to a flap on the box and lifts up to open. I secured it with a glue dot to keep it closed. This would be fun for a gift card or any small gift.

Recipe:
Mortarboard Gift Box Top view
Cricut Cartridge: Happy Hauntings
Brad: Imaginisce I-Top Tool
Patterned Paper: Crate Paper, October Afternoon
Trim: The Girls Paperie
Pearls: Recollections
Floss: DMC (black)
Adhesive: Beacon Adhesives Zip Dry, Glue Dots
Stickers: Karen Foster
Chipboard: Misc.

Cuts:
Box Base
"3DBox" cut from the Happy Hauntings cartridge cut at 11.5 inches from black toile patterned paper.

Thanks for stopping by,

CarrieAnne

Sunday, October 9, 2011

We R Memory Keepers Sew Easy Review

Sew Easy Stitched cards with Sentimentals Cartridge
 If you follow my blog, you know I have a pathological fear of sewing machines. They make me nervous - most likely because they outsmart me at every turn. The only tension I associate with them has nothing to do with a bobbin and everything to do with a furrowed brow and me stressing out. With this is in mind, you can understand why I was excited to try out the We R Memory Keepers Sew Easy product line. I have a few of the different design heads, the mat and the handle. I thought I would give you a quick review and my first two projects with the tools.
We R Memory Keepers Sew Easy Stitch Piercer Tool System

 The Price Point: 
Sew Easy Stitch Piercer Tool: $9.99
Heads: 3.99
Piercing Mat: 7.99


The Concept:
The idea behind the product is pretty simple. Using the handle and the interchangeable heads, roll the tool across cardstock and pierce designs into your paper. Then use regular floss or string to stitch in your designs with the provided needle.


The Reality:
I had a difficult time getting the tool to actually pierce through the paper. I would classify this more as an embosser and even with that I would always pull the tool towards you when working. When I pushed away from myself the results were dreadful. I used the recommended mat and applied a great deal of pressure. The supplied needle was rather dull so I used the tool and then went back with my paper piercer to pierce the holes. Given that paper piercing templates are dreadfully expensive and I LOVE to make holes in stuff, I am still going to be using these tools, but I won't be buying additional heads. I will view these as embossers or pattern creators.

Grade Based on Advertised Function: B-

Card featuring Sew Easy "Banners" Design
Pros:
1. Lots of different designs to choose from

2. Love the compartment in the handle to hold the needle - no more finding it with your feet in the carpet.

3. Because this is a free hand system you can make your stitches curved, straight or use them to outline and accent something.

4. Keep your packaging because each card comes with suggestions for doing several different stitches with the same head.

5. The mat is quite large and allows you to stitch on a layouts and cards without having to readjust your paper.

Cons:
1. Needle is WAY to big which causes you to waste thread when you want to secure your ends or try to squeeze in that last stitch.

Card featuring Sew Easy "Love" Design
2. This tool is more of an embosser than a piercer as on each of the heads I tried the majority of the dots did not pierce through the paper.

3. On several of the heads key pierce points are missing on the design and don't emboss at all, because they are not even there. This was especially true for the "love" head as I kept having to look at the packaging to fill in the blanks myself.

4. I would love for the head to have a marker on it so I could know when the design begins to repeat. This would be especially nice for designs with wording. Who wants "ove" instead of "love" on their Valentine's Day card?


Please note this is an independent review, and I am in no way affiliated with We R Memory Keepers.

Thanks for stopping by,
CarrieAnne


Recipe:
Cricut Cartridge: Sentimentals
Tools: We R Memory Keepers Sew Easy Product Line
Embossing Folder: Cuttlebug: Swiss Dots
Patterned Paper: We R Memory Keepers
Cardstock: Couture Cardstock
Bakers Twine: The Twinery
Floss: DMC
Adhesive: Beacon Adhesives Zip Dry

Cuts:
White Scallop Card
"Label1" cut at 4 inches from white cardstock with the "card" function selected.

Monday, October 3, 2011

Altered Mini Trash Can

Give A Hoot Cartridge Altered Mini Trashcan

I came across this trash can a few weeks ago on a Target clearance end cap. My husband is something of a hamster when it comes to paper bits. He has a hard time parting with them so they make piles around his home computer. I thought I would alter the can and put it next to his monitor so he would be prompted to throw out his used post its and what not right away. The original can had a bizarre color combination and dot pattern so I covered it with Sassafrass Lass Paper and die cut stickers.

To make the cute little balls of wadded up paper I used white cardstock and Stampin' UP!'s three flower punch. Spritzed them with water, scrunched and piled them on the trash can die cut.

Recipe:

Cricut Cartridges: Give A Hoot
Patterned Paper: Sassafrass Lass
Cardstock: Couture Cardstock
Pearls: Recollections
Epoxy: Epiphany Crafts
Punch: Stampin' Up!
Die Cut Stickers: Sassafrass Lass
Ink: VersaMark
Mini Trash Can: Target
Adhesive: Beacon Adhesive Zip Dry, Stampin' Up! (Glue Dots)

Cuts:
"Don't Be Trashy" sentiment from the Give A Hoot Cartridge: "TrshBr-S" cut at 2 inches in orange and at 1.75 inches in red.

Trash Can from the Give A Hoot Cartridge:
"TrshBear" cut with the "Layer" function selected from gray cardstock at 2.25 inches and the "TrshBr-S" cut from gray cardstock at 2.25 inches.

Thanks for stopping by,

CarrieAnne

Wednesday, September 28, 2011

Rounding Out the Cowboy Party Fun

These are the rest of the pictures from our Cowboy Party this Past weekend.

We had lots of fun activities including:

Panning for Gold


Hobby Horse Races ( I made 20 of these horses - they were the souvenirs for the kids to take home)


The kids roped and rode horses and cattle


We also had a photo booth where the kids could use disguises I put on sticks and props from the local thrift shop and dollar stores.


There was a great train chase jello eating contest (I used a William Sonoma train cake pan and the kids had to gobble up the trains before the law arrived)


What party could be complete without table decorations, a birthday banner and lots and lots of food?

Birthday Banner I made with my Cricut (the gorgeous lady is my Mother-In-Law who made the fantastic cake being cut)


I decorated the water bottles by making Belly Bands with My Cricut and Big Shot

The adults used mason jars for drinking the rootbeer and lemondae. I put striped straws with little pennants that said "Let's Party" in each one.


In addition to his amazing 3 tier cake, Reid had this super cool personal cowboy cake all to himself to eat. My Mother-In-Law made this one too!


I made the following fun treats to eat:


Personal Star Shaped Apple Pies

Smores on  a Stick

Chocolate Cacti (pretzels covered with green chocolate and coconut)

Chocolate dipped rice krispie treats shaped like stars, hats, and cowboy boots

Veggies with dips in indiviual containers (I love the sentiment on top - Every cowboy needs a little Ranch!)


Chips served in clear cups with coordinating cupcake liners on the inside.I also made the stand from various dollar store finds and some cowboy themed scrapbooking paper.


I also made fun place settings for each child at the table - with a wanted poster coloring sheet, gingham plates, cut paper bags for placemats, jean pocket silverware holders, and cow spotted cups. I couldn't find cups like this for a decent price so I just colored them with a Sharpie Marker myself.


The party was a bunch of work, but so worth it!! This little cowgirl needs a vacation from the ranch :)

Thanks for stopping by,

CarrieAnne