Thursday, June 16, 2011

"In God we Trust" 4th of July Card

As a veteran married to a veteran who is the daughter of two veterans and the grand daughter of veterans patriotic holidays are a big deal in our family. I wanted to make a few cards for the 4th of July and here is the first one I came up with last night.  I love the "A Child's Year" cartridge, but rarely use the silhouettes as silhouettes.  Instead, I cut them a bunch of time and create my own layers with different colors of cardstock and by adding little details like the belt, shirt color, hair and pant leg cuff.


Have a fantatic weekend and be sure to check back on Tuesday for my last post with My Pink Stamper - I can't believe the 6 months have flown by so quickly and our DT term is already up!

Recipe:
Cricut Cartridges: A Child's Year, Tags, Bags, Boxes and More, Plantin Schoolbook
Embossing Folder: Cuttlebug: Swissdots
Patterned Paper: Graphic45, October Afternoon, Prima, Miss Arts Papercrafting School: Ruth's Recipe Kit
Dies: Nestabilities Circles: 3," 2.25" 

Star Punch: EK Success
Lace: Wyla
Adhesive: Zip Dry, Glue Dots, Tombow Aqua Liquid Glue
Buttons: Misc.

Cuts:
A Child's Year: "4July2-s" cut at 2.5" from white, peach, brown, gray, black, and white cardstock, blue star patterned paper, and yellow patterned paper

Tags, Bags, Boxes and More: (round card base) "circle" cut with "mirror" function selected at 2.75 inches

Plantin Schoolbook: "star" cut at 6.5"

Thanks for stopping by,

CarrieAnne

Tuesday, June 14, 2011

Color Combos Ice Cream Pint and Sandwich Card


Last week, as part of my work for Miss Art's I was able to provide a project for Color Combos Galore.
The theme was "What We love about Summer" and the color pallet provided below. I love ice cream all year long - but especially in the Summer. So I made an ice cream pint gift box and matching ice cream sandwich card.


I created the template for the ice cream pint from the easy sounding process of "trial and error". It should be called "trial and nightmare" - round shapes (especially lids and bottoms) can be real pain to do from scratch.

Once the template was made it all came together pretty quickly and I think the ice cream sandwich card is particularly cute.

Thanks for stopping by,

CarrieAnne

Recipe:
Cricut Cartridge: Sweet Treats, Storybook
Embossing Folder: Cuttlebug Swissdots
Stamps: My Pink Stamper (Everyday Sentiments, Sweetest Cupcakes)

Ink: Stampin' UP! (Basic Black, Cool Caribbean)
Dies: Nestabilities (4" circle, 2.5" circle, 4" Scallop Circle, 2" x 4.25" rectangle, 2" x 4.25" Scallop Rectangle)
Buttons: JoAnns
Ribbon: Misc. (Tan and white polka dot)
  
Cuts:
Ice Cream Sunday - 1.25" (pg 30 Sweet Treats)
Label 2", 2.25" ( "Marquee1" pg 66, Storybook)

Friday, June 10, 2011

June My Pink Stamper Pinkalicious Blog Hop

 Welcome to my stop along the June My Pink Stamper Pinkalicious Blog Hop!

Hopefully you arrived here from Edna's blog. If you just happened upon the hop be sure to head to the My Pink Stamper blog so you can start from the beginning and see all of the team's amazing work. If you have been following along the whole time, Heather, our guest hopper is next!

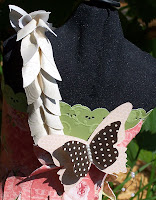
This month  we were challenged to use any of Robyn's amazing stamps, bright colors and the Summer season as inspiration. One of my favorite things about Summer is all the vintage fun that can be found at garage sales, flea markets and thrift stores. This vintage vibe put me in the mood to make a fifties inspired garden party dress on a dress form whose outfit was long in need of an update.

The My Pink Stamper stamps are versatile and perfect for card making, scrapbooking or home decor projects like this one. The "butterfly" sentiment on this project is from a Christmas set! (Winter Punnies)  Robyn's choice of beautiful fonts and her super smart selection of sentiments means any one of her stamp sets is perfect for a variety of creations and that together they are quite the tool kit for expressing yourself in a wide array of projects.  Window shop the entire My Pink Stamper product line here and be sure to buy a few  here.

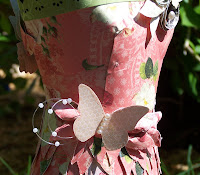
The bulk of the dress is made up of over 350 individual tulip cuts from the Bloom Cricut Lite cartridge. They were adhered to a cardstock base I designed myself and then hand embellished with stickles. The "rusched" one sleeve strap is the same tulip cut sprayed with water and then "pinched." Once the paper dries it hardens and maintains its shape. As a chef would say, I served tulip "two ways."

A list of all the Pinkalicious blogs involved is below, as well as my supply list and cut information.


Thanks for stopping by,
CarrieAnne


Recipe:Stamps: My Pink Stamper: "Winter Punnies"
Cricut Cartridge: Cricut Lite: Bloom
Dies: Stampin UP! Butterfly Die
Patterned Paper: Chatterbox, Miss Arts Papercrafting Company: Ruth's Recipe Kit, Webster's Pages
Acrylic Embellishment: Webster's Pages
Ink: Tsukineko: Brown
Punch: Stampin' UP! Scallop Border, Marvy Uchida: Small Butterfly
Glitter Glue: Ranger Stickles: Star Dust
Pearls: Recollections
Pearl Strand, Tulle Pick: Hobby Lobby (Floral Supply)
Adhesive: Beacon Adhesive's:  Zip Dry, Stampin' UP! Stampin' Dimensionals
Dress Form: Hobby Lobby
Misc:.Pearls Beads, Pink Crepe Paper

Cuts:

1. The entire skirt of the dress is made from the "Flower13" cut with the "Layer/Shadow" Function selected.

2. Use the "Auto Fill" function on 12x12 sheets of paper with the size set to 2 inches. This will cut 56 tulips per sheet. You will need roughly need 3 sheets of white and 3 sheets of pink patterned tulips.


Tuesday, June 7, 2011

Where did that post go??

If you have been searching my blog of late, you may have noticed a number of projects have disappeared. I have been very blessed to have 16 projects picked up for publication over the next couple of months! When this happens the projects have to be pulled from my blog until one month after publication.

I have never been published in a print magazine before so this is very exciting for me. I wouldn't have had the nerve to even submit my work if it wasn't for the great feedback and encouragement I receive here on the blog - thanks so much!! I'll be sure to share snapshots of my pages appearing in print when I get my copies of the magazines!!

  I can't wait to share more of my creations with you and hope you are having a crafty day.

CarrieAnne

PS Don't forget the My Pink Stamper blog hop this Friday!!!

Friday, June 3, 2011

Happy Boy Layout


After 8 years of hoping for a boy, this past September we had our (not so) little Reid. This layout is of his first trip to church - I can't get enough of him in vests and suits!

The layout features Epiphany Crafts' charms, vintage settings and round 14 Bubble caps. I LOVE the versatility of being able to make my own customizable charms, buttons and epoxy embellishments. If you don't own their amazing set of tools head over to their website HERE to find out all the details on how you can.

The vintage setting I used (above the celebrate) was white and it was easy to alter and distress with standard acrylic paint.

I know my local Archivers is now carrying the entire Epiphany Crafts product line which is great for a quick trip when I need more Bubble Caps or Vintage Settings.

Recipe:
Tools: Epiphany Crafts (Clear Round 14 Bubble Caps, EC Shape Studio Round 14, EC Charm Settings Silver,Clubhouse Vintage Settings)
Chipboard Banner: Maya Road
Patterned Paper: My  Mind's Eye
Pearls and Bling: Recollections
Lace Flower: Prima
Misc.: Bird's nest charm