Wednesday, April 27, 2011

Last Chance for a Miss Art's Wednesday Giveaway


First let's announce last Wednesday's free all access 1 month Extra Credit subscription  winner in the Miss Art's Papercrafting School Blog Celebration:

Maria - you are the winner. Be sure to email me at serendipitousscrapper@gmail.com with your contact data to claim your prize.


If you didn't win, don't fret you have a few more chances to win. Each business day (Monday-Friday) in the month of April we will be giving away one free monthly all access Extra Credit subscription to a lucky winner who leaves a comment on the staff member of the day’s post (so leave your comments here today!) and posts our count down blinkie in their sidebar!

You can get the countdown code HERE. It will appear at the very top of your screen. Copy the entire code, and paste it into the "Add HTML" section under "Design" in Blogger.


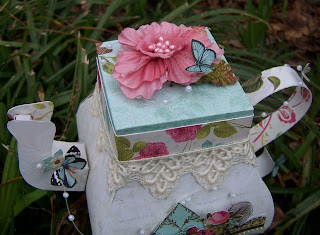
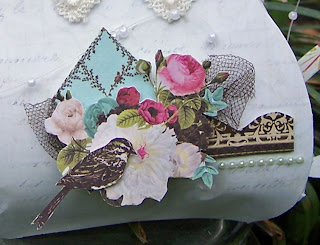
Onto my fourth and final projects I created using just one of the Miss Art's March kit: Madeline's Song. If you have followed along all month you know that I created a 3d teapot, shaped card, hair clip and a 12x12 layout - all with one kit. I have plenty of materials left over to work on a mini album to!

Though I love to play with paper and its seemingly endless possibilities, what really draws me to a  papercrafting product is its storytelling capacity. When I see a piece of paper which captures the joy of my son's first smile, a shade of glitter which will sparkle just as brightly as my daughter's eyes on her first roller coaster or a vintage trim which will frame a serene pause on my grandmother's porch eloquently, I fall in love.
Because in the minutes I spend in crafting a touchable memento of a fleeting memory, I am able to transcend time and live in the very best of what this life has to offer. Finding paper and embellishments which live up to such expectations is a challenge. I trust Miss Art's to craft kits that will awaken my inner muse while they delight my fingers. Read on to learn all about Madeline's Song, the Miss Art's kit for May.


In the 16th century there was a queen famed for her delicate beauty who defied the fears of a nation to pursue a marriage which would assuredly end in her death. This kit filled with 7 Prima papers from the collection bearing this heroine's name, is a mixture of elegant flourishes, sweet floral details and resolute patterns which will infuse any project with strength, beauty and a hint of the hope permeating young love. "Madeline's Song" is the very first of Miss Art's exclusive kits. Though it is loaded with a royal bounty including 17 flowers, over 50 embellishments and Miss Art's own vintage touches, it won't cost you your dowry.

** You can absolutely purchase this kit with no other obligation, but you would be remiss if you did not partake in the amazing class taught by CK Dream Team member Stacey Cohen. Her easy to follow technique focused instruction highlights the versatility and beauty of "Madeline's Song.”**


Read on for more exciting information on Miss Art's Paper Crafting School!

Have you ever wished there was a school which only taught your favorite classes, that had the best teachers and where tuition was so affordable it left you plenty to buy the most stylish school supplies? Miss Art's Papercrafting School is a virtual academy for every student who wants to learn the latest techniques from the paper crafting industry's leading experts and it is opening its doors for the first time in days.

Subscriptions to our monthly classes start at $5.00 and include live online chats and personal email responses from your favorite designers. Consisting of 2 - 12 videos with unlimited monthly access each class is the perfect blend of individualized crafting and supportive learning.


Miss Art’s Papercrafting School Blog Celebration Schedule
Thursday: Stacy Cohen
Friday: Alyssa McGrew

Thanks for stopping by and celebrating with Miss Art’s as we count down to the best first day of school ever!


CarrieAnne


Wednesday, April 20, 2011

Take a Break with Miss Art's Papercrafting School

First, let's announce last Wednesday's free all access 1 month Extra Credit subscription  winner in the Miss Art's Papercrafting School Blog Celebration:

sweetlilscrapper - you are the winner. Be sure to email me at serendipitousscrapper@gmail.com with your contact data to claim your prize.


If you didn't win, don't fret you have an opportunity to win again EVERY DAY in the month of April! 

Each business day (Monday-Friday) in the month of April we will be giving away one free monthly all access Extra Credit subscription to a lucky winner who leaves a comment on the staff member of the day’s post (so leave your comments here today!) and posts our count down blinkie in their sidebar!

You can get the countdown code HERE. It will appear at the very top of your screen. Copy the entire code, and paste it into the "Add HTML" section under "Design" in Blogger.


Onto the third of 4 projects I am creating using just one of the Miss Art's March kit: Madeline's Song.         


I have four great kids - sweet lovable, totally cute, but at ages 8,5,3, and 6 months I sometimes feel like the old woman in the shoe - who had so many children she didn't know what to do! I thought using the shoe from the nursery rhyme would be a fun shaped card for an A Girl's Night Out Invitation. The card is made entirely from my remaining Madeline's Song kit items, except for the pearls and a bit of brown cardstock. I used the Cricut, My Community cartridge for the shoe cut.


The neat thing about Miss Art's Papercrafting School is their unique focus on learning new techniques, but even if you aren't interested in taking a class their kits are a fantastic value for their diversity, quality of contents and abundant materials. 

Here is the down low on the March Kit: Madeline's Song:


In the 16th century there was a queen famed for her delicate beauty who defied the fears of a nation to pursue a marriage which would assuredly end in her death. This kit filled with 7 Prima papers from the collection bearing this heroine's name, is a mixture of elegant flourishes, sweet floral details and resolute patterns which will infuse any project with strength, beauty and a hint of the hope permeating young love. "Madeline's Song" is the very first of Miss Art's exclusive kits. Though it is loaded with a royal bounty including 17 flowers, over 50 embellishments and Miss Art's own vintage touches, it won't cost you your dowry. 


If you were to buy the contents of the kit separately the tab would come to $34.76. The Miss Art's price is: $28.50. 


You will also be getting a fantastic surprise bonus item provided by teacher, Stacy Cohen!


** You can absolutely purchase this kit with no other obligation, but you would be remiss if you did not partake in the amazing class taught by CK Dream Team member Stacey Cohen. Her easy to follow technique focused instruction highlights the versatility and beauty of "Madeline's Song.”**


Read on for more exciting information on Miss Art's Paper Crafting School!

Have you ever wished there was a school which only taught your favorite classes, that had the best teachers and where tuition was so affordable it left you plenty to buy the most stylish school supplies? Miss Art's Papercrafting School is a virtual academy for every student who wants to learn the latest techniques from the paper crafting industry's leading experts and it is opening its doors for the first time in days.

Subscriptions to our monthly classes start at $5.00 and include live online chats and personal email responses from your favorite designers. Consisting of 2 - 12 videos with unlimited monthly access each class is the perfect blend of individualized crafting and supportive learning.


Miss Art’s Papercrafting School Blog Celebration Schedule
Thursday: Stacy Cohen
Friday: Alyssa McGrew

Thanks for stopping by and celebrating with Miss Art’s as we count down to the best first day of school ever!


CarrieAnne


Tuesday, April 19, 2011

April My Pink Stamper Design Team Post - Cowboy Birthday Favors


Welcome to April's My Pink Stamper Design Team post. If you haven't visited Robyn's My Pink Stamper website to see the entire team's artwork be sure to click on this link HERE to do so. Our challenge was to create a favor (any kind) using our Cricut and My Pink Stamper Stamps (of course!) If you are interested in purchasing any of My Pink Stamper's fabulous sets click HERE to find all of Robyn's products and retailers.

After 8 years and three daughter's worth of pretty princess parties and high teas I am beyond excited about my son's first birthday this summer. I was torn between a train, fireman or cowboy theme, but the picture of my son on the wanted poster in an old fashioned rocking chair cast the deciding vote in favor of a cowboy party.

I made four favors and the cuts for each are below as well as the whole recipe!

1. Wanted Sign 
 I plan on taking pictures of the party attendees in cowboy hats and bandanas and then attaching them to Wanted signs, and placing a magnet on the back so moms can put them on the fridge if they like. I used a variety of words from the Sweet Baby and Everyday Sentiments My Pink Stamper Sets to spell out the text.

Cuts: 
The Sign: Page 44 of the Old West cartridge. Select "q" and the "icon function". Cut at 9.5 inches from off-white cardstock.

"Wanted": Used individual letters from the Old West Cartridge cut at 1.5 inches from Cosmo Cricket Paper. I cut the letters twice and layered them so they would really stand out.

2. Hobby Horse Lollipop Treat

A dum dum lollipop is attached to the horse with glue dots. The "thank you" sentiment is from the My Pink Stamper Sweet Baby stamp set.


Cuts:
The "Horse" cut on page 59 of Create a Critter. I cut him from tan cardstock at 3 inches. I then cut him with the "Layer 1" function from white and brown cardstock. I used a paper punch on the brown layer  to create the circles around his eye and bandanna. I cut his mouth using the layer 2 function from brown cardstock and his bandanna from Cosmo Cricket paper with the Layer 3 function. His "bangs" are DMC floss bunched together in loops and held down by glue dots. His mane is a scrap of looped ribbon trim from my scrap bin. The original horse was full body so I cut the rest of him away with scissors so that the hobby horse stick would show.


3. Loot Bag
 Because I wanted this loot bag (which holds animal crackers and other small treats) to really look like rumpled fabric I sprayed the die cut with paper and then crumpled it up. I allowed it to dry from about 15 minutes and then carefully uncurled the cut bag. Be VERY careful as score lines will rip when wet if you aren't delicate.  After the paper completely dried  I cut off the handles to the bag and assembled it. Hemp was then used to close the top. I inked all the edges and added the dollar sign with dimensional adhesive.


The Bag: 
"Robot" cut on page 40 of Wrap it Up with the "Box" function selected. I cut the bag out at 9.5 inches from Cosmo Cricket paper.

The "$":
I cut the "$" from page 57 of the Old West cartridge, by selecting the "4" and the "shift" function. Because I wanted it to really pop off the bag and stand up to wear, I cut it 4 times at 1 3/4 inches and adhered them together.They were added to the bag with dimensional adhesive.


4. Birthday Boy Sherrif's Badge


The other little boy guests will have badges with their names handwritten on them, but Reid needed one with his birthday title on it! I used the "Sweet Baby" Stamp Set for the "Birthday Boy" sentiment. The paper is shimmery and 110 pounds so it looks very "official" (in the words' of my girls) and will stand up to little hands messing with it. I added a self adhesive pin back so it could be worn on a shirt. Be sure to use a Stazon ink so the glossy finish on the paper does not smear your stamped sentiment.


Badge Cuts:


The star badge was cut by selecting the "6" on page 59 of the Old West cartridge and using the "Icon" function. It was cut from shimmery silver cardstock at 3 inches. The inner star was cut using the same cut with the "shift" and "icon" functions keyed. I also used a sizzix folder to emboss the inner star and I added half pack silver pearls for fun.


Recipe:

Stamp Sets: Sweet Baby and Everyday Sentiments
Cricut Cartridges: Old West, Create a Critter, Wrap It UP
Embossing Folder: Sizzix
Patterned Paper: Cosmo Cricket
Pearls: Reminisce
Ink: Tsukineko (blue, black and brown), Stazon (black)
Miscellaneous Ribbon
Lollipop (dum dum)

Thanks for looking,

CarrieAnne

Friday, April 15, 2011

Batty about You


If you have ever been a fan of Christmas in July, perhaps you will also like Halloween in April!  Recently a number of online Scrapbook stores have seriously reduced the prices on last year's Halloween lines.Because I acknoweldge I have a papercrafting addicition, I know I need to feed it as cheaply as possible. This means I rarely buy a line when it is newly released, but I do go a bit nutty when it is cleareanced out. I just received all sorts of awesome Halloween products and just couldn't resist sharing a few projects I made from them throughout the rest of the month.

This little bat is from the Hello Kitty Greetings Cartridge - isn't he just the cutest! I love that this cartridge includes a number of shaped cards on it and the bat itself opens while the rosette is the card base.

Recipe:

Cartridges: Provo Craft: Hello Kitty Greetings, George Basic Shapes
Embossing Folder: Cuttlebug: Textile Texture
Dies: Spellbinders: Nesting Scallop Circles
Patterned Paper: Echo Park Paper Co.: Happy Halloween
Pearls: Want 2 Scrap (Black)
Ink: VersaMark
Paper Piercer
Embroidery Floss: DMC (Black)
Adhesive: Stampin' UP!: Stampin' Dimensionals, Tombow: MonoAdhesive, Beacon Adhesive's ZipDry


How To's


1. Use the "Bat" cut on page 72 of the Hello Kitty Greetings Cartridge with the "Card" Function selected to cut hinged bat card from black cardstock at 4 1/4 inches.

2. Select the "Clothes/Clothes" function and  the "Bat" cut and cut the black layer pieces out from black cardstock at 4 1/4 inches.

3. Use the Cuttlebug Textile Texture embossing folder to emboss all of the layer pieces cut in step 2.

4. Ink the edges of the wing and feet embossed pieces with VersaMark ink and adhere to bat card base.

5. Adhere a piece of patterned purple paper between the eye holes of the bat head.

6. Layer the bat's head over the belly layer piece and add interest by using dimensional adhesive.


5. Remove the remaining black card base border around the head with scissors as seen in pictures so that the head is the only portion of the bat without a solid black outline of cardstock around it.

6. Use a paper piercer to punch a border of holes around the wings and feet.

7. Embellish bat head with pearls so that the eyes have a small purple outline.

8. Use DMC floss to add thread to button and adhere button nose with glue dot.

9. Cut two scallop circles by using Spellbinders' largest scallop circle nesting die.

10. Score between every scallop.

11. Use scissors to cut from the end to the mid point of one score line. Repeat this for both scallop circles.

12. Accordian fold on the score lines to create two pleated half  circles.

13. Glue half circles together to create a full pleated circle by overlapping one scallop on each side and adhering with glue dots.

14. With orange cardstock cut at a 3 1/2 inch circle with the "circle" cut on page 108 of the George and Basic Shapes cartridge.

15. Adhere orange circle to back of rosette with Beacon Adhesive's Zip Dry for stability.

16. Adhere embellished black card to rosette with Beacon Adhesive's Zip Dry.

Tuesday, April 12, 2011

Steppin Out in Style with Miss Art's Papercrafting School & Giveaway

First let's announce last Wednesday's free all access 1 month Extra Credit subscription  winner in the Miss Art's Papercrafting School Blog Celebration:

Bunnyfreak - you are the winner. Be sure to email me at serendipitousscrapper@gmail.com with your contact data to claim your prize.


If you didn't win, don't fret you have an opportunity to win again EVERY DAY in the month of April! 

Each business day (Monday-Friday) in the month of April we will be giving away one free monthly all access Extra Credit subscription to a lucky winner who leaves a comment on the staff member of the day’s post (so leave your comments here today!) and posts our count down blinkie in their sidebar!

You can get the countdown code HERE. It will appear at the very top of your screen. Copy the entire code, and paste it into the "Add HTML" section under "Design" in Blogger.


Onto the second of 4 projects I am creating using just one of the Miss Art's March kit: Madeline's Song.         

Flower embellished hair clips are all the rage at the moment, but if you look at the price tag most stores boost you could easily be seeing red. I absolutely love the vintage hymnal paper in the "Madeline's Song" kit and thought that it would be a beautiful backdrop for a handmade hair clip. All the materials used in the clip are from the Madeline's Song kit, except for the black tulle, the banana clip (from the dollar store) and the beautiful model (my 6 year old!).

In order to add dexterity and durabilty to the vintage paper you will need to coat it at least twice with Mod Podge on both sides of the paper, but the extra effort is definitely worth it. 


The neat thing about Miss Art's Papercrafting School is their unique focus on learning new techniques, but even if you aren't interested in taking a class their kits are a fantastic value for their diversity, quality of contents and abundant materials. 

Here is the down low on the March Kit: Madeline's Song:


In the 16th century there was a queen famed for her delicate beauty who defied the fears of a nation to pursue a marriage which would assuredly end in her death. This kit filled with 7 Prima papers from the collection bearing this heroine's name, is a mixture of elegant flourishes, sweet floral details and resolute patterns which will infuse any project with strength, beauty and a hint of the hope permeating young love. "Madeline's Song" is the very first of Miss Art's exclusive kits. Though it is loaded with a royal bounty including 17 flowers, over 50 embellishments and Miss Art's own vintage touches, it won't cost you your dowry.

** You can absolutely purchase this kit with no other obligation, but you would be remiss if you did not partake in the amazing class taught by CK Dream Team member Stacey Cohen. Her easy to follow technique focused instruction highlights the versatility and beauty of "Madeline's Song.”**


Read on for more exciting information on Miss Art's Paper Crafting School!

Have you ever wished there was a school which only taught your favorite classes, that had the best teachers and where tuition was so affordable it left you plenty to buy the most stylish school supplies? Miss Art's Papercrafting School is a virtual academy for every student who wants to learn the latest techniques from the paper crafting industry's leading experts and it is opening its doors for the first time in days.

Subscriptions to our monthly classes start at $5.00 and include live online chats and personal email responses from your favorite designers. Consisting of 2 - 12 videos with unlimited monthly access each class is the perfect blend of individualized crafting and supportive learning.


Miss Art’s Papercrafting School Blog Celebration Schedule
Thursday: Stacy Cohen
Friday: Alyssa McGrew

Thanks for stopping by and celebrating with Miss Art’s as we count down to the best first day of school ever!


CarrieAnne


Friday, April 8, 2011

April My Pink Stamper Pinkalicious Blog Hop

Happy Spring and welcome to the April My Pink Stamper Pinkalicious Blog Hop!

If you are just happening on the hop please be sure to start at the My Pink Stamper blog to see all of the projects created by Robyn and the MPS team. If you have been following along the whole time you should have just come from Shauna's blog.

After checking out my project and the tutorial below be sure to visit Karlee's blog next!

Our challenge was to create a birthday inspired project with any My Pink Stamper stamp set. I decided to make a vintage inspired birthday hat for my daughter's 6th birthday this Summer. Ironically, she was not home when I took the pictures so my 3 year old is having a blast being the model.

I used the "Birthday" sentiment from the "Happy Birthday Sweetie" stamp on the "Sweetest Cupcakes" stamp set and the "Girl" sentiment from the "Sweet Baby" Stamp set.

The blue rosette was created from the scallop on page 53 of the Sweet Treats Cricut Cartridge and the "6" is from the Carousel Cricut Lite Cartridge. The cone is from a pattern of my own design and I also created the crepe paper fringe. The fringe is easy to make and super cheap too! Visit your local party store to find a wide array of colors at about a $1 a roll.

RECIPE
Stamp Sets: My Pink Stamper: Sweetest Cupcakes and Sweet Baby

Cricut Lite Cartridge: Carousel (the number 6 cut at 2 3/4 inches using the Font Function and Shift Key)

Cricut Cartridge: Sweet Treats (The rosette is created from two flower5's cut at 4 1/2 inches with the Shift Key)

Paper: Madeline's Song Kit: Miss Art's Papercrafting School
Pink Flowers: Prima
Glitter: Stampendous
Pearls: Recollections
Brown Ink: Tsukineko
Misc: Crepe Paper, Pink Tulle, Ribbon


The entire blog hop list of artists and their projects follows:
Thanks for stopping by and for those interested in how to make the fringe - read on below.

CarrieAnne
Fringe Tutorial
1. Cut each color of crepe paper to your desired length. 18 inches for the hat shown.

2. Layer the 3 crepe paper lengths one on top of the other and stitch down the middle. You could use the straight stitch on a sewing machine, but I used a loose stitch and a needle and thread.

3. Fold the crepe paper in half and cut just shy of the stitched line down the length of the paper.

4. Open the layers again and "fluff."

5. Use your fringe on all sorts of fun projects!!

Wednesday, April 6, 2011

Time for Tea with Miss Art's Papercrafting School


I am excited to announce my involvement with a new company: Miss Art's Papercrafting School. Owned by one of my best scrapping friends, Alyssa McGrew, Miss Art's is an amazing resource for every paper crafter. This teapot is the first of four projects I will be posting using Miss Art's March kit: Madeline's Song.

The teapot is based on a template by the fabulous Lauren Meader and
all of the materials are from the Madeline's Song kit, except for the pearls which were from my stash.


The neat thing about Miss Art's Papercrafting School is their unique focus on learning new techniques, but even if you aren't interested in taking a class their kits are a fantastic value for their diversity, quality of contents and abundant materials. Here is the down low on the March Kit: Madeline's Song which I will be creating with all month long.

In the 16th century there was a queen famed for her delicate beauty who defied the fears of a nation to pursue a marriage which would assuredly end in her death. This kit filled with 7 Prima papers from the collection bearing this heroine's name, is a mixture of elegant flourishes, sweet floral details and resolute patterns which will infuse any project with strength, beauty and a hint of the hope permeating young love. "Madeline's Song" is the very first of Miss Art's exclusive kits. Though it is loaded with a royal bounty including 17 flowers, over 50 embellishments and Miss Art's own vintage touches, it won't cost you your dowry.

** You can absolutely purchase this kit with no other obligation, but you would be remiss if you did not partake in the amazing class taught by CK Dream Team member Stacey Cohen. Her easy to follow technique focused instruction highlights the versatility and beauty of "Madeline's Song.”**


Read on for more exciting information on Miss Art's Paper Crafting School!

Have you ever wished there was a school which only taught your favorite classes, that had the best teachers and where tuition was so affordable it left you plenty to buy the most stylish school supplies? Miss Art's Papercrafting School is a virtual academy for every student who wants to learn the latest techniques from the paper crafting industry's leading experts and it is opening its doors for the first time in days.

Subscriptions to our monthly classes start at $5.00 and include live online chats and personal email responses from your favorite designers. Consisting of 2 - 12 videos with unlimited monthly access each class is the perfect blend of individualized crafting and supportive learning.


You may purchase our reasonable kits to compliment your course or pull items from your own stash using our detailed supply lists.

To countdown to our grand opening select teachers and staff will be participating in a month long blog celebration. Be sure to check back each Wednesday as I will be sharing projects made with Miss Art’s March Kit with you.


Nervous about trying something new? Most new students have a few first day jitters so we want to give you the chance to get to know us better. Each business day (Monday-Friday) in the month of April we will be giving away one free monthly all access Extra Credit subscription to a lucky winner who leaves a comment on the staff member of the day’s post (so leave your comments here today!) and posts our count down blinkie in their sidebar!

You can get the countdown code HERE. It will appear at the very top of your screen. Copy the entire code, and paste it into the "Add HTML" section under "Design" in Blogger.


Miss Art’s Papercrafting School Blog Celebration
Schedule
Thursday: Stacy Cohen
Friday: Alyssa McGrew

Thanks for stopping by and celebrating with Miss Art’s as we count down to the best first day of school ever!


P.S.- Come "Like" Miss Art's on Facebook for a chance to win some great Prima prize packs!


Sunday, April 3, 2011

Chocolate Easter Bunny Card

With Easter just around the corner I have been having visions of my favorite Spring treat - chocolate Easter Bunnies. The bunny cut is from the Cricut Lite: Celebrate with Flourish cartridge and was cut at 6 inches. By combining dry embossing and all over heat embossing on the bunny I was able to create a "chocolatey" finish. This card is also fun because the bunny itself is the hinged card. I created the ribbon rosette for the tail by running thread through ribbon and pulling the ends of the thread and then tying a knot. This is also the way one creates a yoyo flower if you add a center. Thanks for hopping by, CarrieAnne Cricut Lite Cartridge: Celebrate with Flourish Cuttlebug Folder: Houndstooth Patterned Paper: K and Company, Three Bugs in a Rug Brown Ink: Tsukineko Embossing Ink: Stampendous Embossing Powder: Stampin' UP! Butterflies: Multicraft Imports Halfback Pearl: Recollections Misc.: Ribbon, Buttons