Today is the day we get to post the projects we made for February with Robyn's new stamp releases over at My Pink Stamper. I had the opportunity to work with
Sweetest Cupcakes.
The set contains 25 expressions all about cupcakes, baking, sweetness, love and yummy food.

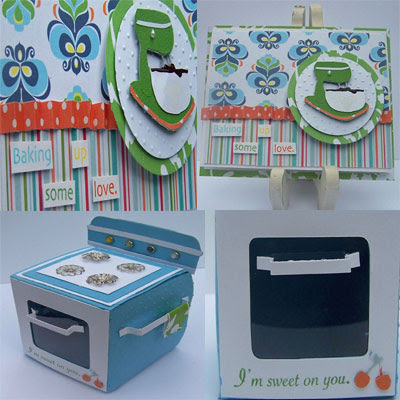
I have had this idea about making an oven gift box in my head for a while, but I wanted to make it super easy so I could do multiples to send a little something sweet to folks from church or friends who are under the weather. Let me tell you this box could not be easier and the how to's are below. I fit a few mini muffins or small chocolate chip cookies in mine. I made the mixer card to match with a little yummy frosting spilling over the edge just like what happens in my own kitchen.
Don't forget to leave a comment if you haven't already to win the 2 bottles of Viva Decor Paper Soft I am giving away. I am picking the winner on Friday.Thanks for stopping by,
CarrieAnne
RECIPE: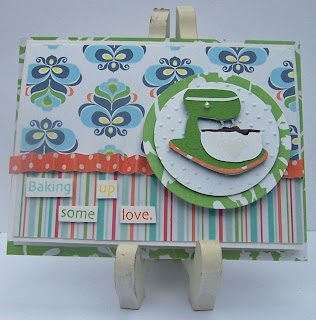
Stamp Set: My Pink Stamper:
Sweetest Cupcakes ("Baking Up Some Love" and "I'm Sweet on You" Sentiments)
Cricut Cartridges:
Bags, Tags, Boxes and More, From My KitchenEmbossing Folder: Cuttlebug:
Swiss DotsInk: Stampin' UP!: Wild Wasabi
Patterned Paper: Imaginisce, GCD Studios
Filigree Metal Flowers (Burners on the stove): Nunn Designs
Dimensional Paint (Chocolate on Mixer Bowl): Viva Decor
Transparency (See through front on oven): Staples
Small cherry punch and 1/16 hole punch: Marvy Uchida
Brads and Half back Pearl: Misc
The How To's on the Oven BoxStove Knob Back Panel1. The only part of the box from From My Kitchen is the knob section (the back panel above the burners) so you could certainly whip up an alternate option if you didn't have this cartridge. This panel comes from the main oven cut on page 30. Cut it out on blue cardstock at 3 inches.
2. Then using the existing upper cut line for the stove door as a guide, remove the bottom portion of the stove front.
3. Using the "layers" function cut out the two white strips and adhere them to the knob panel.
4. Using a 1/16 hole punch pierce the center of each of the 4 marked "knobs".
5. Insert your favorite brads in the holes to act as knobs.
6. Set aside this stove panel momentarily.
Oven Box1. With the "Fit to Length" option selected and the "Window" function on cut out two of the square boxes found on page 119 at 11 1/4 inches from the Bags, Tags, Boxes and More cartridge. You will need one in light blue cardstock and one in white cardstock.
2. Fold the blue boxe in half and dry emboss it with your Swiss Dots Cuttlebug embossing folder.
3. Score on all of the fold lines with a scorer or bone folder.
This is an important step if you want a balanced and stable box. Hand folding without scoring can make it wonky!4. Adhere a small square of clear

transparency to the inside of the box behind the cut out square.
It is important to do all your embellishing before you assemble the box. With this in mind we are now going to add the details.5. Use your paper cutter to remove the panel on the white cube box with the window section. Stamp "I'm Sweet on You" on the lower part of this section. Punch cherry out and adhere next to sentiment. Adhere white window panel over the blue window section of the blue cube box.
6. Use scraps from the white cube box to add the handles on the front and side of the oven. I used glue dots and then bent the strips of paper for dimension with my fingers.
7. Cut a small scrap of patterned paper and fold it in half over the side oven handle. Adhere ends of the patterned paper with one glue dot. Snip a tiny fringe if desired. This is now a dish towel embellishment.
8. Using scraps of cardstock create the layered stove top - white, then blue, then white cardstock squares. I made mine fit just inside of each other and I dry embossed my blue layer with the Swiss Dots embossing folder.
9. Add your stove burners with a glue dot. I used filigree metal flowers from Nunn Designs, but you could use stamped flowers, circles, epoxy stickers, buttons, or round paper clips.
10. Assemble your box and add glue dots where needed to keep flaps together.
11. Slide in the "knob panel" into the top opening of the box. Adhere with glue dots.
You are DONE!!!


