Monday, December 27, 2010

A tiny bit of Paris ...


One of the trade show booths I worked on this year showcased a Parisian Boutique theme and I made two mini Eiffel Towers for it (I shared the other one earlier in the month). The towers stand at about 3 feet. Remember my swooning over Cuttlebug embossing folders in a previous post. This project is a big reason why I shout their merits from the hill tops. Because the pieces to this tower were so large, they could not be run through a Big Shot. So after trying everything I could think of from using a rolling pin to smacking an embossing folder with a meat tenderizer I went old school and used a stylus and a Sizzix texture plate to do the embossing by hand. It took forever and was much like shooting in the dark as I could not see the texture plate and was primarily embossing by feel on very thick metallic cardstock.

The butterflies were cut from metallic vellum with a Stampin' UP! die and the bling is from Michael's Reminisce line.

Thanks for looking,

CarrieAnne

Wednesday, December 22, 2010

A Balancing Act ...


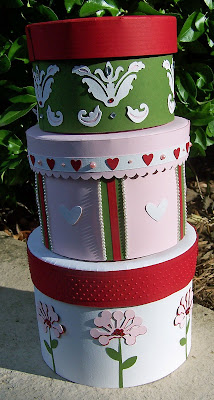
Here is the second set of hat boxes I mentioned in my last post. I actually have these out in my home as Christmas decorations now. I like the incorporation of the pink, as a not so traditional Christmas color.

The top green box is embellished with Quickutz flourish die cuts and a few highlighting bits of bling. The red cardstock on the lid is heavy weight 110lb that comes embossed with columns on it.

The middle pink box incorporates a variety of heart punches in several sizes and shapes. The rows of white pearls and the individual pink pearls are from Michael's Reminisce line.

As in the previous set of stacking boxes the bottom box is my favorite. I once again used the red column embossed cardstock for the lid, but this time added a strip of smooth red embossed with the Cuttlebug Pin dot folder. The flowers were cut with the Cricut and I added different sized red bling bits for the centers. I really liked the contrast of the pink on the red for the flowers.

I am torn as to whether or not to gift these little guys or hang on to them with the rationalization that they could be used for Valentine's Day decor. Choices, choices!

Thanks for looking,

CarrieAnne

Monday, December 20, 2010

Box on top of Box on top of Box


Today and tomorrow I will be sharing with you the last of my trade show projects for this year. This is the first of two stacks of hat boxes that I made. The boxes were your run of the mill paper mache containers from Michaels. Because the larger containers could not be covered in 12x12 sheets I used parent sheet cuts to prevent myself from having to deal with messy seams. Parent sheets are extra large cuts of paper (the size the mills cut before chopping it down to 12x12 for retail) and they are super fun to work with as they expand your options considerably.
The top white box is really a combination of punches that I cut and pieced to make the art deco flourish. I used a scallop punch for the lid border strip and then used the same punch again to get the tiny circles in tan for the flourish embellishment.

The middle mettallic blue box is covered in 3/4 inch ovals I cut with my Cricut and a paper bow I made using two strips of paper.

The bottom pink box is my favorite. I actually used the spiral ornament die from Sizzix to make the rolled flowers. It was a super quick method for making so many and making them somewhat uniform in size. I ran the spirals through the Cuttlebug in a flourish embossing folder and then inked them for a bit of interest. I punched a number of five petal flowers out and cut them apart for the green leaves. The pattern on the pink portion of the box was created by crossing 1/8 pink strips. I used the canvas textured side of the cardstock for the base of the bottom box and the smooth side of the paper for the strips for added contrast. I then glued the pearls on by hand.

On all of the hatboxes I used a combination of red line tape and Beacon Adhesives to get everything to stay together.

Now that the boxes are done their trade show duties I think I will fill them with something yummy and give them to the girls' teachers for holiday gifts with a nice ribbon and bow on top.

Thanks for looking,

CarrieAnne

Thursday, December 16, 2010

Bigger is Better ...


The only thing I love more than a shaped card, is a jumbo shaped card. I came across some very large envelopes (8x8) and had been wondering what I could do with them. This gift card (pun intended :) is 7 3/4 x 6 1/4 and is perfect for such a large envelope. I traced the shadow layer onto folded black cardstock to create the card with a hinge at the top.

I designed it for The Pink Stamper's challenge this week. We were to use 2 shades of blue, 2 shades of pink, and black in one project. The gift package stack is from the Winter Frolic Cricut Cartridge. I used a combination of piercing, embossing, inking, and punches to create the embellishments. The holly is created by my cutting and grouping individual pearls with leaf punches. The light blue package is dry embossed with the Cuttlebug Victorian folder. The white stripes on the dark blue package were dry embossed with the Cuttlebug Pindot folder. The "Happy Holidays" stamp is from Stampin' UP!

We have been having dreadful weather so I ran outside to snap a photo really quick and noticed a piece of scrap paper in the image! How frustrating and now its pouring again, perhaps I can get a better image later.

Thanks for looking,

CarrieAnne

Wednesday, December 15, 2010

Zero Calorie Ribbon Candy

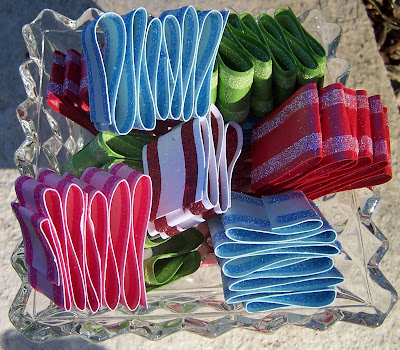
In finishing my holiday decorations I needed a little something extra for my buffet table. A bit of ribbon candy in a crystal candy dish would be perfect, but I faced one little problem. Since having the baby I have been working really hard at getting my not-so J.Lo posterior back and a big bowl of ribbon candy tempting me every time I rounded the corner was not going to help me reach my skinny jeans goals. Zero calorie paper ribbon candy, however posed absolutely no threat.

My love for metallic cardstock is once again apparent as I cut several different colors into two inch strips. I then ran two rows of red line tape on each side of the carstock and covered the tape in coordinating microglitter from Stampendous. To get the true ribbon candy shape I then sprayed the paper with water (the glitter doesn't come off) and folded it back and forth. I placed the folded paper between two heavy soup cans and let the paper dry over night. This wetting and drying process does a pretty good job of creating the right shape, but a few glue dots were used on particularly rebellious pieces. These also make great Christmas tree decorations when you thread a string through the middle, and they are a great craft for the kids (minus the glitter if you aren't feeling overly vacuumy).

Thanks for looking,

CarrieAnne
Sunday, December 12, 2010

Tickling the Ivories ...


This is a picture of our youngest daughter Maddie (about 15 months in this shot) at our local children's museum. What is neat about this photo is that she heard the music coming from the piano first and was obviously trying to follow it. When the child who had been "playing" the music stopped Maddie was visibly confused and began trying other things to replicate the sound. She actually ran into the piano accidentally and this "bumping" created the noise she was looking for. It was practically impossible to get her to stop pounding this little piano to death afterward.

This is a simple and quick layout I made from an older sketch at The Scrappiest's blog. I have found in my newborn induced sleep deprived state that sketch's sure do help jump start the creativity. The paper is a mix of Stampin' UP! and Crate. The tile embellishments are Chatterbox. I added a paper pierced border around the circles and the baubles and buttons are miscellaneous items from my stash. For some reason I normally find layouts with circles a bit intimidating so I was glad to try something a bit out of my comfort zone.

Thanks for looking!

CarrieAnne

Wednesday, December 8, 2010

From our House to Yours ...


This is a Christmas Card I made for my uncle. The inside reads "From our House to Yours, Happy Holidays." As the snowman is made with a Martha Stewart punch that I cut apart and embellished, I am entering the card in two challenges that require punches. The challenge at Paper Pretties and the one at Totally Paper Crafts.

The scalloped circle base of the card and the white inner circle were made with Nestabilities. I then used my piercer to create the border around the white circle and a Cuttlebug Embossing folder to add the pindots.

The house is from the Jolly Holidays Cricut Lite Cartridge. I added details like the curtains (I used the Martha Stewart Hydrangea punch and cut the flowers apart) and the door knob which were not on the cartridge. The patterned paper is from Stampin' UP and the chunky glitter I used to replicate snow is JoAnn Essentials. The little snowman is a Martha Stewart punch and I added the hat, buttons, arms and scarf to jazz him up a bit.

Our goal is to get some family photos taken tomorrow so hopefully I will have some new pictures to scrap next week of holiday happiness. Though with 4 kids under 8 there is a strong likelihood the photos could reveal holiday snarkiness as well. Any tips on how to get all four kids to smile with their eyes open at the same time?

Thanks for looking and have a great weekend!

CarrieAnne

Tuesday, December 7, 2010

Grass ... its whats for Dinner


I had these pictures of my second oldest daughter developed over a year ago. They have just been sitting on my scrap table saying - scrap me, scrap me (for blackmail in the future if nothing else). This week's sketch from Sketchy Thursdays motivated me to get them on a page and safely into an album.

When we lived in the Netherlands, Bella was fascinated by how really, really bright the vegetation was. Every time I put her down at a park or in our back yard she went right to eating the grass. It didn't seem to matter what I did or how many times I cleaned her hands off. As soon as I stepped back to take a picture, the grass went right back in her mouth.

I consoled myself by seeing it as her fascination with the world around her. Though she has stopped treating the environment as her own personal snack pantry, she is still amazed by vibrancy, color and nature - and I LOVE that about her.

The patterned paper is Stampin' UP!, the pearls are Reminisce, the buttons and ribbon are from my stash. The mist is from Tattered Angels and is their Starfish color. The title is made from a Crate Paper "Lillian" alphabet.

I made the toad stools by cutting apart and layering the Toadstool on the Cindy Loo Cartridge. I used the border function and then manipulated the shapes to get the layered affect I wanted. I used a Crafter's Workshop template to guide my piercing and embossed the trunks of the mushrooms with the Victorian folder from Cuttlebug. I think inked them with Versamark.

Thanks for looking,

CarrieAnne

Monday, December 6, 2010

Cardmaking with Scraps


Before I clean up from making a scrapbook page I normally try to squeeze a card out from the scraps. Often times I even mimic the newly created page's layout so that the card comes together super quick.

Here is a little note card I made for a friend of mine with a new baby, using the remnants from Reid's layout a few weeks ago. Sorry for the shadows in the picture, the weather has been dreadful outside and I had to take the photo indoors.

Thanks for looking,

CarrieAnne

Friday, December 3, 2010

Puresonally...


If your holiday season is anything like mine, it passes by in a blur and only weeks after it is over do you realize that it is gone. Between the new baby and spreading holiday cheer, my poor craft room has been missing me. I have a pile of projects from trade shows this year that I have not yet posted so I thought I would use my December posts to do so.

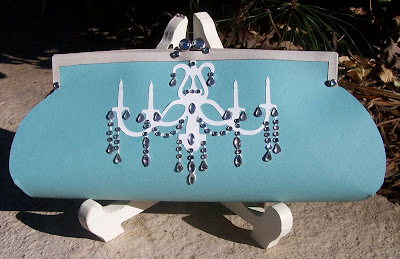
I am not sure if it is considered proper etiquette or not to admit it, but I love this little blue clutch. I made the pattern from scratch, sketching and cutting out different mock ups until I achieved the right size and dimension. After I cut the blue cardstock out, I lined it with Basic Grey patterned paper and then wet the entire template pretty thoroughly with a spray bottle of water. I then clipped the top together with large binder clips and let it dry overnight to achieve the overall shape and rounded bottom a real clutch bag would have.

The chandelier is from the Home Decor Cricut cartridge. The picture does not show it well, but it is cut from a very pretty glossy white 110 pound cardstock. I individually glued the bling bits on with Beacon Adhesive. The silver "frame" of the purse and clasps are from metallic silver cardstock and the purse actually opens and closes by manipulating the jeweled brads.

The sides consist of accordion folded pleats that prevent anything from falling out and I think I could easily fit a few dollars, a lipstick and a mirror it in with no worries. I am hoping for an opportunity to use it in real life, because it is just so darn cute in person.

Thanks for looking,

CarrieAnne