
Candy Cones Tutorial by Andrea Amu
One day while I was glancing at some pine cones that the daycare children at my work painted, I got an insane idea to paint up some cones of my own to look like candy corn! Thus, the creation of Candy Cones!
 |
| DIY Halloween Glitter Candy Corn Pine Cones Curtsey Boutique Designer Andrea Amu |
Here I first gathered my supplies.

Then I got to work painting 3 different pinecones each with sections of white, orange and yellow acrylic craft paint.

Allow each cone to fully dry.

Apply a heavy coat of spray adhesive to each cone. (Work on one cone at a time until each is completely finished with next step of glittering).

You'll want to make these cones look as sweet as candy... sugar them up with some glitter! I used plenty of Diamond Dust glitter by FloraCraft for these cones.

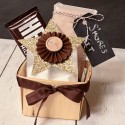
Now you will need a fabulous container to display these festive cones. I chose to use a wood berry basket from Curtsey Boutique! I've embellished mine with a strip of tied on burlap and I've hot glued on two Curtsey Boutique flowers and a burlap star.

I've also taken a strip of Curtsey Boutique's kraft masking tape and I've stamped Antique lettering on it with the words, "Candy Cones!". Apply the strip to a burlap tag and tie off onto the basket to complete.

Looking sweet!
Supplies-
Pinecones
Acrylic Craft Paint
Orange Raffia (to fill in basket)
Spray Adhesive
Glitter
Ink
Alpha Stamps
Curtesy Boutique Products
 |

what a cool project!!! I'm gonna have to make some:0:)
ReplyDeleteThanks, Connie!! They did turn out sweet and I will be making more of them myself! ;)
ReplyDeleteWhat a great idea! Thanks for the inspiration!
ReplyDeleteThanks, Sheila!!
ReplyDelete