
 |
| DIY Tag Border Tutorial Curtsey Boutique Designer Connie Mercer |
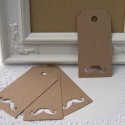
1. Select 5 tags, 1 envelope and 1 mustache tag. Ink around the edges if you like.

2. Use a hole punch to punch a small hole in the flap of the
envelope.

3. Adhere a small piece of black cardstock behind the mustache tag.
4. Tie the orange twine on the tags and arrange them to your
liking.


Other Supplies:
Authentique/pattern paper
Bazzill/cardstock
October Afternoon/stickers
Graphic45/black trim
Queen & Co./yellow pearls
Curtsey Boutique Supplies

No comments:
Post a Comment
I love feedback and appreciate the time it takes you to leave it :)